Sunday, May 15, 2011

And then a miracle occurs...

Remember the old Far Side cartoon? 

Knitting lace is a lot like the formula on the blackboard.  To the left on the blackboard, you have the mathematic variables, the yarn, the needles, the pattern, the actual knitting of the lace, during which time you have an object that looks, at best, like an uninspired lump of yarn, and at worst like limp ramen noodles or a pile of used dental floss.  To the right on the blackboard, you have the solution to the formula, a gorgeous lacy finished project. 


Unblocked lace looking kinda "meh"  The Grateful Crane project linkand pattern link yarn: Debbie Bliss "Angel" 


"Step two" has a special name in knitting, it is called Blocking and is truly a place where miracles occur.  During blocking, lace opens up and reveals just the right balance of matter (string) and anti-matter (air).

I like to think of my knitting as my baby.  I conceived the idea for the project, it gestated for a while until I came up with the right combination of elements (pattern, yarn, needles), and as I knit it, it became an object in its own right, separate from me.  Just like a baby, sometimes a work in progress (WIP) is a darling, playing happily on the needles, growing by leaps and bounds, other times it may suffer from colic and need some gentle nurturing; still other times it may be a complete brat and earn a bit of a time out to think about its misdeeds.   

At some point, my "baby" will be all done playing on my needles.  Since it has a tummy full of the yummiest yarn I can provide, it is now ready for a bath and a nice nap. 

Giving your baby a bath  AKA a step by step guide to blocking your (wool) knitting:

These instructions are intended for wool or mostly wool items.  Read the label on your yarn before following this! 

1- start by washing out the sink - you wouldn't put a baby in a dirty bath, would you?

2- fill the sink with nice warm water and a little mild wool wash (gentle shampoo works also in a pinch). Make sure the water is not too hot or too cold. 

3- put your baby gently in the bath water, making sure to submerge it completely.  Hold it under the water for a minute, if needed, to let the air bubbles escape and ensure that it all gets wet.


4- let the baby rest quietly in the water for 10-20 minutes to ensure that the water penetrates and relaxes the fibers.  Do not aggitate the baby, they don't like that and may cry (or felt) if aggitated while wet.  This is a good time to make up a nice bed for the baby.  Interlocking foam pads (called Blocking Boards) are ideal, but if you don't have them you can make do nicely with any bed you aren't going to be using for a day or two or a freshly vacumed carpet.  Put down a few layers of towels to protect the bed or carpet (foam pads work better without towels).  For small items like hats or cowls (or sweater parts), an ironing board works great and has the advantage of being waist high, which is much easier than crawling around on the rug.

5- after the baby has been thoroughly soaked, pull the plug, being careful not to throw out the baby with the bathwater. 

6- while the water drains, prepare several towels for receiving the baby.  I use at least two, but bigger or bulkier babies might require more.  Spread the stacked layers of towels out on the bathroom floor.

7- gently but firmly squeeze the water out of your baby.  Don't wring or twist though, that would be mean and might cause pain, or worse, stretch the baby out of shape.

8- drop the baby -- err, gently lower the baby onto the nest of towels.  Spread it out a bit, allowing it to room to kick its little legs and arms, but try not to stretch it out. 


9- fold the bundle of towels over, tucking the little tyke in carefully.  Now roll the towels tightly and step on the roll, letting the towels absorb as much of the moisture as possible.


10-  bring the bundle over to the crib -- err, blocking mats and unroll.  If you don't have blocking mats, the bedspread or sheet or freshly vacuumed rug will all work fine.  You may want to lay down a few layers of dry towels to help keep the bed/rug dry, but be aware that those extra layers can make the baby take longer to dry.

At this point, the baby analogy really runs out.  If this were an actual baby, I would recommend tucking it in with its blanky and teddy and kissing it goodnight.  The management of this blog does not recommend or endorse yanking, stretching, and pinning out real babies.  To avoid being viewed as a sick and twisted person, I will now switch from "baby" to "FO" (finished object).

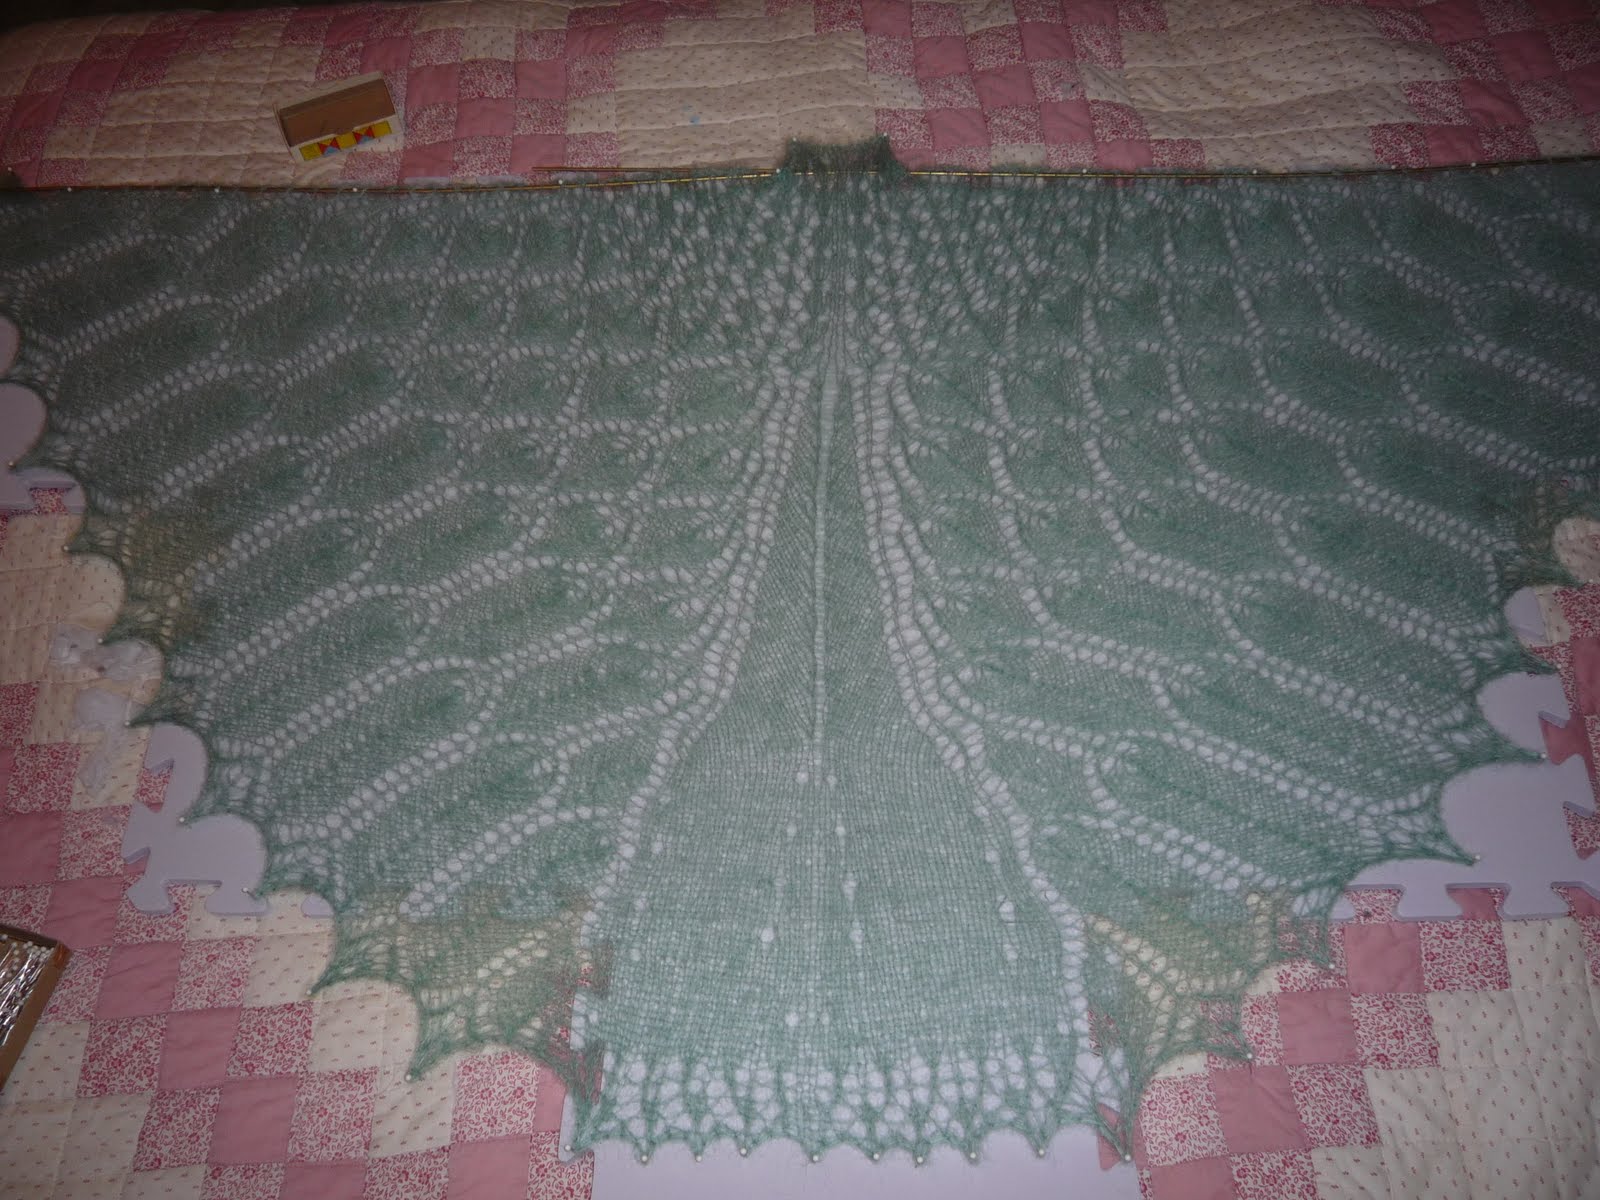
11 - smooth the FO out on the mats, approximating the desired shape/size.  I recommend making note of the pre-blocking dimensions at this point.  Note that it still looks pretty "meh", the only real difference is that now it is "meh" and wet.

12- select two directions most important for final shaping.  In the case of a shawl, these are most likely to be along the wing span (top edge) and along the spine (middle back).  For a sweater, it would most likely be the width and length of the sweater body.  Since this FO is a shawl, we'll start at the center back of neck and work out along the arms and down the center back,  stretching and putting in some preliminary pins.  I like to block lace quite aggressively, so frequently these first pins need to be moved as the entire FO begins to relax, stretch, and take shape.

13- if the FO has straight edges, blocking wires can frequently be threaded through the work to maintain a crisp sharp straight edge.  There are lots of options, ranging from pre-packaged blocking wire kits (most expensive and not necessarily long enough wires) to dental floss or cotton yarn (cheapest) threaded through and pinned taut like a clothes line. I use stainless steel (fairly rigid) and coated carbon steel (thinner and more flexible) welding rods that I picked up quite cheaply at Fleet Farm.  

This picture shows why I love blocking so much.  See how the pattern is opening up and emerging on the far right?  At the point when the picture was taken, I had threaded the coated carbon steel welding rod through the yarn overs along the border and stretched the wing out widthwise along the rod, pinning at intervals along the way.  Then I had stretched and temporarily pinned down the center back to maintain a fairly straight line.   Then I began working my way down the side, stretching out and pinning each point to make the scalloped edge.  Typically, I alternate top bottom side to side to maintain even tension.  In this case, however, I was so enraptured watching the lovely feather pattern emerge that I worked around counterclockwise from the left edge.

See what I mean about blocking being miraculous?  From "meh" to "ooh" by the magic of water and quilting pins.

14- once it is all pinned out, go around and adjust any pins as needed to straighten out a line or even out the scallops on the edging, etc.  Try not to obsess over this stage.  Then stand back and admire.  Make sure you allow the FO to fully dry before removing the pins. Once dry, the wool will "remember" the way you pinned it, although some yarns may do a little "bounce back" and lose some of the size you gained or the sharp pointed edges. 

15- take post-blocking measurements and photos and enjoy your post-miracle item!

So, to recap ...   Before                     
And After                     

About the shawl
This lovely shawl was a test knit for designer Joy Gerhard.  She called it The Grateful Crane after a wonderful Japanese fable and through July 31, 2011, she is donating 50% of the proceeds from the pattern sales to MSF (Doctors Without Borders) to aid in disaster relief from the earthquakes and tsunami in Japan.  Great organization, great cause, great pattern. 

While working on it, I kept thinking there was something familiar about the feather patterns.  Then one day, I looked up at the marchesite swan watch pendent from my Great-Aunt Jean and it hit me.  Joy may have named it The Grateful Crane, but to me, it is The Grateful Swan.


Saturday, May 7, 2011

While My FLS Gently Blocks

So much to post, so little time lately.

First stop, my poor long suffering February Lady Sweater has finally made it to the blocking mats.  I love this sweater.  I love the simplicity of style, I love the lace, I love the history of it, I love the yarn, I love how easy it is to modify to my taste and body, I love how forgiving the lace pattern is.  I enjoyed every minute of knitting it, and would knit another in a heart beat.  I think this is the first sweater I've made for myself that will really fit me well and I'll be proud to wear in public (still got my fingers crossed here).


Ravelry Project Link Visualize Whirled Peas FLS

I am simply at a loss as to why it took me from July 2010 to May 2011 to make it.  How did I let myself get distracted over and over again with another project (or 2 or 3 ... )?  For that matter, how did it take me a full month to block it after I finished?  I understand that my 198 yds of heavenly malabrigo was on the mats when I finished FLS, but still, that was done blocking in 2 days.  Sometimes I don't understand myself at all.

I learned a lot from this sweater, and that learning carried over to the blocking.  I have a very firm preference on where the yoke ends and the lace begins; I want that line to be between the middle and bottom of my breasts.  So after reading other knitters comments about how their FLS grew when it hit water, I made a conscious decision to stop the yoke about 2 inches above where I wanted the yoke to end  - roughly 10" vs 12-13 -- expecting that the weight of the yarn and lace body would pull the yoke down that much.  Likewise, I bound off a couple of inches shy of where I wanted the sweater to fall at mid hip -- 22" vs 24-26.

So, I gave the sweater a nice bath,  squeezed the water out in towels and plopped it down on the mats, where it measured 26" long (perfect), but still precisely 10" at the yoke.  Hmm...  

Then it hit me, in a classic "duh" moment ... when I changed the yoke from garter stitch to stockinette, I completely changed the angles and degree of stretch.  The lace body stretched because it is so open and, well, lacy.  Plus, last year when I learned that EZ got the same gauge on a size US 6 needle that I got on a US 9 (and read her comments about new knitters knitting too tightly), I followed her advice and made a conscious decision to loosen up a bit, so the gauge on my lace was looser than the gauge on my yoke.  This was fine with me because I want to make sure the sweater overlaps a bit in the front, but I should have included it in my calculations.

So instead of the easy just-lay-it-out-and-smooth-a-bit blocking I was expecting, I had to do quite a bit of gentle stretching to bring the yoke down to 12-13" from shoulder while gently "smooshing" the body to maintain the 26" length. 

Just a thought, but am I the only one who is surprised that my measurement from shoulder to mid-breast are exactly half the distance from my shoulder to mid hip?  I always thought I was short waisted and joke that my ribs practically touch my iliac crest when I sit, but I think this confirms it.  I swear that on nicely shaped women (like my friend Gayla),  mid boob would fall about 1/3 of the way to her hips.  I'm going to try very hard to resist the temptation to run up to women with a tape measure this week ...  

Next time, I know to knit the yoke to desired size without expecting stretch. 

And this ends today's lesson.  Now a word from our sponsor, the jolly short-waisted 5'5" giant:

Saturday, April 16, 2011

Bob and Rainy's Heavenly Day

I love spring.  It is definitely my favorite season.  I love watching the way the buds on the trees are bigger at lunch than they were in the morning and are even larger when leaving work that night.  I love watching the grass turn green before your eyes.

What I don't like about spring in Wisconsin is days like last Saturday, where large globs of slush fall from the sky, mixed with cold stinging rain and leave an inch of semi-transparent grey goo on the ground.  

But this time we managed to take a yucky day, a computer, a guitar, and a ball of Malabrigo and turn it into the perfect day.

It all started when I went rummaging through the worsted stash and stumbled upon this little gem:

a full skein of Malabrigo Worsted weight 100% merino joy in the Whales Road colorway that I had bought to make my nephew a hat and never used.

Now I am not a big fan of variagated yarns.  To me, they can be too arbitrary and distracting -- it's white!  no, it's Red!  no, it's green!  now it's pink!  I really prefer tonal colors, where the yarn moves subtly from lighter to darker shades of the same basic color, cohesive without being boring.

For example, a variagated "muddled mess":

versus a harmonious tonal:

And yes, I know you can find as many knitters who prefer the variagated picture as you can who agree with me and prefer the tonal, it is totally just my subjective preference, but this is my blog so we are talking about what I like :p

Anyway, the Whales Road is just a little stretch of my comfort zone, tonal cool blues with a splash of tonal purples and rich mallards to make it more exciting.  It was the perfect antidote to falling slush.  But what to turn it into?

A quick search on Ravelry found the perfect thing, a shawlette (little shawl) designed to use a single skein of worsted weight yarn; aptly named 198 yds of Heaven (Rav pattern link).  There is nothing like lace on US 9/5.5mm needles
to give a sense of instant gratification.

So, Bob fired up his computer (mine was still in the shop <sigh>), loaded Heroes of Might and Magic V, and  made a new map, while I cast on my shawlette.  Heroes is a fabulous game and our game of choice for two reasons:  (1) it is turn based, which means I can knit while he plays his turn and he can play guitar while I do mine, or we can both walk away and do dishes or cook dinner without any negative results; the game sits and waits for OUR convenience, and (2) we can create custom maps that allow us to play as ALLIES.  I like my husband and like being married to him too much to play against him.  We are both too competitive to have THAT end well, trust me on this.  Game developers who lament their inability to woe women gamers should pay attention to this (but won't, which is why Heroes is unique).

And we passed a heavenly day of domestic and knitterly tranquility.

Our Happy Family:  happy Bob engrossed in his game with happy Noel taking a bath while happy Psyche looks on.  Happy Daisy is out of sight on her bed under the computer and happy Rose is off stage to the right waiting for me to put down the camera, pick up the knitting from my chair and pet her some more.

And by Tuesday, I had this:


Almost instant gratification.

Saturday, April 2, 2011

A Trio of Finished Objects

It feels as though I've had less knitting time than usual lately, however I've actually accomplished a lot in the last few weeks, so today I actually have three (THREE!) finished objects for your viewing pleasure.

First up, we have Nancy's Comfort, a comfort shawl to help Nancy deal with the sudden loss of her husband at age 64.  I haven't been saying much about this project, but here it is finished:

Pattern:  Janet's Shawl  Knit in Lion Brand Home Spun Colorway: Wildfire.  Ravelry Pattern Link  and Project Link

Totally unlike Cindy's comfort shawl, since their personalities and situations are so different.  For Cindy's, I wanted an earth tone for grounding and a somewhat tailored shape.  For Nancy, I wanted FIRE with a rustic, homespun feel. 

The shawl came out just the way I wanted it, the color, texture, and shape are just what I envisioned.  Only one problem; I really dislike the yarn!  The shawl desparately wants a good blocking, but sadly it is 100% acrylic and doesn't block the way wool does.  It is also lacking wool's wonderful "bounce", so even though I did Jeny's Surprisingly Stretchy Bind Off using needles 2 sizes larger than I used to knit the body, the edges are still very rigid compared to the stretchiness of the garter stitch body.

The pattern is a very basic elongated V shaped shawl with YO at the beginning and end of each row for increases, and garter stitch in between.  I modified it by adding a row of YO, K2tog across 2 rows before the bind off to add an eyelet row across the long edge to match the eyelets caused by the increases on the two sides of the triangle.  You can make this out in the left side of the picture just above the knot. 

The second finished object is Ginny's Not Boring Poncho.  My original design (or as original as you can get with a poncho, which is a pretty basic garment), I am really pleased with how it came out as well.  LOVE the color and it was a fun, quick knit.


Pattern from my head.  Yarn:  Viking Balder 100% superwash wool.  Ravelry Project Link
I wound up using all but about 15 inches of 3 skeins.  Instead of a ruffle at the bottom edge, I switched to US15 / 10mm needles for the final skein and did a decorative border to mirror the collar (1 round purl, 1 round knit, Purl bind off).  The bulk from the purl rows on 10mm needles actually cause it to ruffle really nicely.

I have never used superwash yarn except sock weight, so I wasn't prepared for the way this GREW when it hit water.  Measurements on the blocking mats are:  Neck = 19-20",  Spine = 27", sides = 25" long, bottom = 44" across.  I was aiming for length in the low 20"s, so this is a bit longer than I had planned.  I guess if it is down to her knees, they can mail it back and I can remove a bit.  But I'm reminding myself that it is April in Florida (it is April here as well, but not quite the same kind of April), so she won't probably be able to wear it much longer this spring anyway and it will still fit her next year (and the year after that and the year after that).

If she likes it, I'm thinking of making a smaller, lighter, more decorative poncho from bamboo or cotton that she can wear in warmer weather.  Something like this:  Karen Stelzer's Summer Poncho (Rav link).  We'll see :)

And finally, we have my February Lady's Sweater, finished knitting just needs buttons, blocking, and ends woven in.  I totally can't wait to block it, this yarn gets so incredible when it hits water.  I just need to wait for the poncho to dry and come off the mats. 

February Lady Sweater  non-Ravelry link! is Pamela Wynne's lovely tribute to Elizabeth Zimmermann's Baby Sweater on Two Needles (aka February Baby Sweater) upsized for women.  It is just a fabulous knit.  Super easy to modify as much or as little as you want to exactly meet your needs.  As of today, there are 10,660 projects for this sweater on Ravelry and an additional 11,320 people have it in their queue, waiting to be knit; that is just amazing!  Great job, Pam,  EZ would be so proud.

When I started mine, I was frustrated by sweaters that DON'T FIT right (yeah, Entrelac Tee, I'm looking right at you!) and really wanted to make this one fit well.  Pre-blocking, it is fitting very well, just a tad short.  That is intentional; I'm assuming that the sweater will grow in length between the blocking and the effect of the lace and the weight of the border.  If I don't pick up the inch or so that it needs, I will most likely undo the bind off and add a few more rows to the body.

The only real modification I made was to the yoke.  The original pattern calls for a garter stitch yoke and, as you well know if you've been reading this blog for a while, I hate garter stitch.  I'm not crazy about the look, but mostly I dislike the way it stretches in unpredictable ways and can really ruin the shape of the garment.  I did NOT want to be one of the people who knit this sweater and bemoaned the fact that it fits wonderfully except when it is falling off their shoulders.  I did a search on "stockinette" in the project pages and found quite a few lovely examples of this sweater with a stockinette yoke and went with that.

I also did my increases by lifting the stitch from the previous row.  I really like the neat and tidy way this increase looks.  It even looks great with the lifeline still in the picture.

The yarn is Misti Alpaca Tonos Worsted, 50/50 alpaca/merino (sigh, I love this yarn) in the Muir Woods colorway.  WEBS link  I call it my "Visualize Whirled Peas" FLS. 

More photos to come.

Sunday, March 27, 2011

The Quest for the Perfect Poncho

A few weeks ago, my Mom mentioned that I should knit a poncho for my will-be-7-this-week niece, Virginia.  I agreed that ponchos were wonderful for kids because you had your arms free for play and they bridged a wider temperature range than most sweaters or jackets.  However, I was strangly reluctant.

So I thought about it over a few days and finally realized why I was reluctant.  To me, Ponchos = the 70s.  I remember the 70s.  I really disliked the clothing then and, frankly, I don't think it has improved over time.  Bell bottoms, hip huggers, tie dye, fringe ... not exactly a shining moment (or decade) for fashion.

I remember being 8 in 1972 and talking to my BFF at the time, Patty.  Patty was wearing bell bottom hip huggers and a tie dye top (yes, at 8).  She asked me why I never wore tie-dye.  I told her I was allergic to it.  Fortunately, she believed me.

So when I think "poncho", I think this:

And this:


And this "men's montrosity horror poncho" -- oh goddess, I'm starting to get hives ...


And I just can't do that to a perfectly charming almost-7 girl.

So time passed.  And I started looking at this as a challenge.  I'm a knitter.  I am in control of what comes off my needles (in theory anyway).  Was it possible to make a poncho that I wouldn't hate?

So I started looking at patterns and just couldn't find one that I liked.  Actually, I found one that I liked a lot, but made the mistake of showing it to my Mother who "pooh poohed" it completely because it "wasn't a real poncho" (no kidding, that's most likely why I liked it).  She also "pooh poohed" ponchos with cables (an improvement in my opinion) and everything else that I showed her.  So I came away from the conversation with 2 decisions made: 

(1) I was going to have to design one myself, and

(2) no way was I letting Mom know what I was doing until it was too late to change it.

My research underscored the two things I had to avoid in my poncho, a big stretched out gapping neck that would fall off one shoulder, and FRINGE.  Now, I have no quarrel with the TV show of the same name, I've never seen it but I've heard it's good, but NO FRINGE is allowed anywhere NEAR my poncho, and this is non-negotiable!   There were also 3 givens, it had to be pink enough to please Virginia but not so pink I couldn't bear to knit it, it had to be machine washable for my sister's sake, and it couldn't be boring for Bob's sake  (Bob is on a kick where he is rebelling against "mundane" and "boring" colors, a completely natural response to this winter).

So, armed with a germ of an idea, I trotted off to Monterey Yarn on Thursday, March 24, in the hopes of finding the yarn that would make this all possible.  I made it through 3/4 of the store and had found only one yarn that I considered "right" when Kathy caught up to me.  I explained my mission.  She said she knew EXACTLY the right yarn, and went straight to the one I had just considered.  We held it.  We rubbed it.  We read the label.  We agreed... just right.


Yarn:  Viking Balder superwash 100% wool, 100gr = 137yds/125m.  Colorway:  465.

I CO 46 stitches  on size US 11 (8mm) circ needles and started with a little bit of a "collar" knit flat 1 row purl, 2 rows knit, 1 row purl (this is how it looks on the outside, it is actually knit as 2 rows purl, 2 rows knit to get that effect).  This gives a little notch at the throat to allow room for the poncho to go over her head.  I will make some I-Cord ties so she can tighten the neck if it is too big or chilly.  I also plan to run a row of single crochet around the inside of the first row so the neck can't stretch out.

Then to join it into the round, I knit to the stitch before the last on the needle, did a YO, knit last stitch on this side, first stitch on the other side (that joined it into the round), YO, K21, YO, K2, YO, K21.  And K around the next row.

This established the pattern, with YO, K2, YO every other row in the front and in the back as increases.

After about 4 or 5 inches, I switched to size US 13 (9mm) needles.  I would have done the whole poncho on 13s, but wanted to do the shoulders a little tighter (okay, so I'm obsessed with not letting this stretch out of shape completely, but I'd rather be cautious than disappointed).


I'm REALLY liking this.  I think Ginny will love the color (it earned the Bob says it's not boring stamp of approval).  and it is SUCH a quick knit!  I started on Friday afternoon and it is about 14" long unstretched (more than twice as long as in the picture, taken Saturday afternoon), which I'm estimating would = about 18" post blocking.  I intend to block it rather aggressively for length.

My intention is to continue knitting till I finish the second skein (coming up quickly), then to switch to US 15 needles and increase in every stitch (ie double the number of stitches) to make a ruffle as long as I can with the remaining (third) skein.  I'm not sure if doubling the stitches will be sufficiently "ruffly", but I hope so.  I could triple the stitches, but that will eat up a lot of yarn and make the poncho correspondingly shorter, so I'd rather split the difference between fullness and length and go with twice the stitches and bigger needles. 

I should point out that it is REALLY hard to design something for a virtually-7-year-old without one handy to measure.  This might come back a week later in the mail with a request for a complete re-knit.  Which would be fine, as long as it was accompanied by a photo of it on her or measurements :P

Now comes the really hard part.  I'm about to head over to Mom's for several hours of DIY bathroom improvement shows.  No way am I not going to work on this poncho while I watch, which means showing it to Mom and reminding her that she can always knit one herself if she doesn't like mine.  Wish me luck.  I vow to not negotiate on the fringe! 

Saturday, March 26, 2011

My Reality vs Real Reality

I like to think of myself as a rational, realistic person.  Sadly, I have recently had to confront the fact that my version of reality often does not match real reality.  It is a bitter bitter truth that I was confronted with during my recent vacation from work.  My reality says that when I have 6 days off from work I can accomplish massive amounts of fun things that I normally don't have time for.  Case in point:

#1 - Fantasy:  if I'm off work, I can do blog posts every day!  Reality:  my first March blog post is the 26th.  Gads.

#2 - Fantasy:  I am absolutely committed to finishing my February Lady Sweater during my vacation!  All I have left is the two sleeves and they are only 3/4 length.  Easy Peasy!  I'll just consider it a "test knit" with a March 12th deadline and get right on it.  

This one has two odd thought patterns in it, the first is easy to spot, that I thought I would finish the sweater by March 12th.  Observe Reality as shown in a March 26 photo:

Project link: "Visualize Whirled Peas" February Lady Sweater
Pattern link:  non-Ravelry Pattern Link 
Knit in Misti Alpaca  50/50 Merino wool/alpaca  100% sheer heaven   colorway: Muir Woods

Please note that one and about a quarter sleeves are done, but that's probably more than you were expecting to see.  <sigh>  (and trust me, it will look better after it is blocked!)

The second fallacy is harder to spot, but it is in the pledge to consider this my own personal test knit, thereby implying that I won't be distracted by someone else's test.  Yeah, right.  But on the plus side, Bob has a lovely new sock.  (As I told my boss the other day when he suggested that perhaps I had a knitting problem, "I don't have a problem, I HAVE a sock." )  Unfortunately, I don't appear to have a picture of the sock available at the moment, but here's a link.  Louche Sock  It was a very fun pattern to knit and I'm looking forward to knitting the second one.  The socks are mirror images of each other, so I will have to bend my mind around the pattern being backwards. 

Bob is also looking forward to the second sock, so he can wear a pair instead of gazing admiringly at a single sock.

The next fantasy didn't happen during my vacation, but it shows what a slow learner I am.

Fantasy #3:  "snow day" means a lovely day sipping tea and knitting while watching lazy flakes fall outside the window.  Reality:  March 23rd - 17.8" of snow = 3.5 hours with a chain saw and a snow blower followed by a nap because we were too exhausted to stay awake after clearing both driveways.  Amazingly, the snow plows had already been by when we went out to clear.  During the day (after the photos) we got an additional 4 inches of snow but no additional branches fell.  We lost 1 very large branch (8-9" diameter), 1 medium branch (4" diameter that was totally hidden in the snow till I hit it with the snow blower), and 2 smaller diameter branches.  Fortunately, when Bob got home from work during the storm he put the car in the garage so the branches didn't hit it on the way down.

Happy Birthday, Mom.  Hope you had snow on your birthday list, cause that's what you got!


This is my favorite picture of the storm, a 9 inch cap of snow sticking straight out from a Christmas light.  It gives a great idea of how wet and heavy the snow was.  Amazing defiance of gravity.


Happy spring!

Sunday, February 27, 2011

A Brief Moment of Sun

Yesterday morning the sun came out. I don't actually know the last time that happened, but it feels like years or at least months. Anyway, when I saw it, I snatched an armful of wool and my camera and ran across the street to my Mom's sunroom.

She was great and managed to not call the police when I burst into her house yelling, "here, put this hat on QUICK", but that might be because she assumed the police were right behind me. Either way, the result was decent pictures of the items I've been discussing for the last few days.

Here's the first hat:


It's a little hard to see the chevron design, but still a pretty texture.

Rav Link

Clearly I failed to complete my knot badge in Girl Scouts.


Next up are final pictures of mara:


And, finally, my new Madelinetosh hat,  Aspen Tam  finished this morning:


The color is more accurate in the bottom picture, it is more a rust than an orange.  See that little knot of yarn?  That's what was left over after I finished the hat.  4grams, 8 yards of a 210yd skein.  I was very happy that I hadn't noticed how little was left until after I finished knitting!

This week's plan is to:
  • finish the body of my February Lady Sweater  Visualize Whirled Peas.  This should be easy, I have begun binding off while uploading these pictures. 
  • pick up the stitches and get a good start on the sleeves, and
  • do a lot of knitting on Nancy's Comfort.